Separating Business Logic from UI View Code
Now that you got a Flutter app that is able to make HTTP request, you may wonder:
- What if my app calls more than one service?
- What if I need to show data from more than one API endpoint, how do I maintain the states?
- What if I want to have detail page and more on my app instead of mere singular list view?
- …and many more 🤯
In this post, we will explore one common state management and pattern on Flutter app, that is Provider and MVVM. Brace yourself, cause this is going to be a long article (and you’ll love this pattern). @
So, here is the diagram on how we want to refactor our app (from post https://medium.com/@madacode/flutter-http-request-with-dio-retrofit-48bdb40fb967)
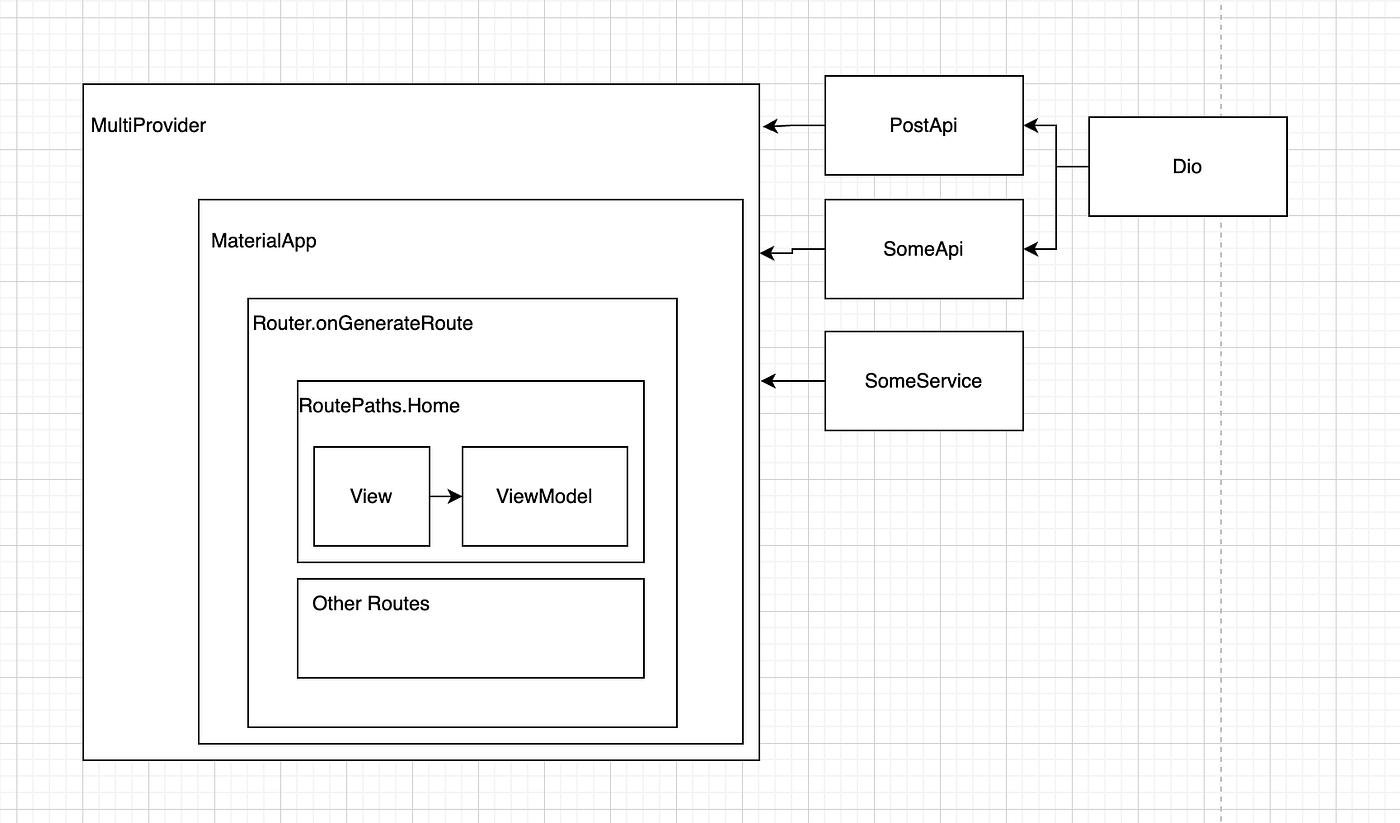
Do note that with MVVM pattern and Provider state management, we made services and APIs available to use from within any part of the app (so long as it is a child of MultiProvider) and separate business logic (which calls API and stores page state) into a ViewModel and keep UI code only taking care view stuffs. With this implementation, we also solve the problem where to keep track of our app’s pages, and that is through router system, for those who are coming from web (React.js, Vue, etc) background may feel familiar to this routing pattern.
Without further ado, let’s dive into the practical steps of implementing MVVM Pattern and Provider State Management and get our hands dirty.
Thanks to FilledStacks youtube channel for providing the GitHub repo for example of this article. You may check the original repo here https://github.com/FilledStacks/flutter-tutorials. And go check out their channel at https://www.youtube.com/channel/UC2d0BYlqQCdF9lJfydl_02Q. Thanks a lot FilledStacks for creating my favorite Flutter MVVM pattern 😀
First, we begin with installing relevant dependencies, on your pubspec.yaml file, in the dependencies section, add the following:
provider: ^6.0.1After saving pubspec.yaml, run flutter pub get to fetch the packages.
Now, create a new file in lib/ui/views/base_widget.dart. This file is going to be base of all our future widget and views (which happen to have its own view model). The content of base_widget.dart file are:
import 'package:flutter/material.dart';
import 'package:provider/provider.dart';

class BaseWidget<T extends ChangeNotifier> extends StatefulWidget {
  final Widget Function(BuildContext context, T model, Widget? child) builder;
  final T model;
  final Widget? child;
  final Function(T) onModelReady;

  BaseWidget({
    Key? key,
    required this.builder,
    required this.model,
    this.child,
    required this.onModelReady,
  }) : super(key: key);

  _BaseWidgetState<T> createState() => _BaseWidgetState<T>();
}

class _BaseWidgetState<T extends ChangeNotifier> extends State<BaseWidget<T>> {
  late T model;

  @override
  void initState() {
    model = widget.model;
    if (widget.onModelReady != null) {
      widget.onModelReady(model);
    }
    super.initState();
  }

  @override
  Widget build(BuildContext context) {
    return ChangeNotifierProvider<T>(
      create: (context) => model,
      child: Consumer<T>(
        builder: widget.builder,
        child: widget.child,
      ),
    );
  }
}
BaseWidget is actually a StatefulWidget containing a Consumer for ChangeNotifierProvider. Type Generic T denotes view model that we create later on, our view model is extended (or abstracted) from ChangeNotifier as denoted in BaseWidget<T extends ChangeNotifier>.
Now, let’s move on to defining our base view model. This view model is our starting point whenever we want to create a view model for our pages. Let’s call it BaseViewModel and create the file at lib/core/viewmodels/base_view_model.dart
import 'package:flutter/material.dart';

class BaseModel extends ChangeNotifier {
  bool _busy = false;

  bool get busy => _busy;

  void setBusy(bool value) {
    _busy = value;
    notifyListeners();
  }
}
BaseViewModel are simply wrapper around ChangeNotifier, and it comes with busy state built in (which are very common state while the app is loading).
With our base is out of the way, let’s move on to defining routes, as they would certainly be helpful if we want to develop our app further, but for now, let’s just define one route, HomeView and then refactor away our home page into HomeView . To define routes, kindly create new file lib/ui/router.dart and lib/core/constants/app_constants.dart to store the route constants.
Now, lets fill our app_constants.dart file with the route constants:
class RoutePaths {
  static const String Home = '/';
}
The route constant convention are usually the page name without the View word. We need to declare the route constants to keep our code clean and avoid magic strings from appearing in our app repository.
Next, we define our router logic in our router.dart file:
import 'package:flutter/material.dart';
import 'package:flutter/widgets.dart';
import 'package:retrofit_dio_example/core/constants/app_constants.dart';
import 'package:retrofit_dio_example/ui/views/home_view.dart';

class Router {
  static Route<dynamic> generateRoute(RouteSettings settings) {
    switch (settings.name) {
      case RoutePaths.Home:
        return MaterialPageRoute(builder: (_) => HomeView());
      default:
        return MaterialPageRoute(
          builder: (_) => Scaffold(
            body: Center(
              child: Text('No route defined for ${settings.name}'),
            ),
          ),
        );
    }
  }
}
Our routing logic function in placed inside a static function named generateRoute inside class Router, then for each route defined in app_constants.dart, it must be defined inside the onGenerateRoute switch-case clause otherwise it would fallback to our “ala 404” page, that is ‘No route defined for xxx’ widget.
With routing logic set up, now let’s set up our provider and register out PostApi service to the list of providers so we can use PostApi anywhere from the app so long as the page is child of MultiProvider. Create a new file in lib/provider_setup.dart and let’s define our provider and its services:
import 'package:dio/dio.dart';
import 'package:provider/provider.dart';
import 'package:provider/single_child_widget.dart';
import 'package:retrofit_dio_example/core/api/post_api.dart';

List<SingleChildWidget> providers = <SingleChildWidget>[
  ...apiServices,
];

List<SingleChildWidget> apiServices = <SingleChildWidget>[
  Provider.value(
    value: PostApi(
      Dio(
        BaseOptions(
          contentType: "application/json",
          baseUrl: '<https://jsonplaceholder.typicode.com>',
        ),
      ),
    ),
  )
];
Since we only have one service/api, that is PostApi we end up declaring only one service/api in the provider setup. Later on, we can add new api into apiServices or perhaps create new list of SingleChildWidget if needed.
Now, the question arises what if my service/api requires some dependency, how do I initialize them in provider_setup? 🤯
Don’t fret, Provider happily accepts that by providing ProviderProviderN (where N is the number of dependencies preceding our service/api) class for us to use. Here is such example of ProxyProvider3 for service/api that have 3 dependencies preceding them.
import 'package:dio/dio.dart';
import 'package:provider/provider.dart';
import 'package:provider/single_child_widget.dart';
import 'package:retrofit_dio_example/core/api/post_api.dart';

List<SingleChildWidget> providers = <SingleChildWidget>[
  ...apiServices,
];
List<SingleChildWidget> apiServices = <SingleChildWidget>[
  Provider.value(
    value: PostApi(
      Dio(
        BaseOptions(
          contentType: "application/json",
          baseUrl: 'https://jsonplaceholder.typicode.com',
        ),
      ),
    ),
  ),
  Provider.value(
    value: SomeApi(
      Dio(
        BaseOptions(
          contentType: "application/json",
          baseUrl: 'https://jsonplaceholder.typicode.com',
        ),
      ),
    ),
  ),
  Provider.value(
    value: SomeService(
      Dio(
        BaseOptions(
          contentType: "application/json",
          baseUrl: 'https://jsonplaceholder.typicode.com',
        ),
      ),
    ),
  ),
  ProxyProvider3<PostApi, SomeApi, SomeService, YourDependantService>(
    update: (
      _,
      PostApi postApi,
      SomeApi someApi,
      SomeService someService,
      YourDependantService yourService,
      __,
    ) =>
        YourDependantService(
      postApi: postApi,
      someApi: someApi,
      someService: someService,
    ),
  ),
];
(do note that this is dummy code and will compile error)
First, we need to define our new service’s dependencies before defining our ProxyProvider3 for our new service, failure to do so will end up in very long lecture from Provider wrapped in red screen 🫣.
We define our ProxyProvider3 with defining the generics parameter with the first 3 parameters being our new service’s dependencies followed by the latter being our new service. the example being ProxyProvider3<PostApi, SomeApi, SomeService, YourDependantService>, next, we declare our update function inside returning our new service with the update function parameter being:
- BuildContext → we stripped it out because we don’t need it
- PostApi → our first dependency defined in the
ProxyProvider3dependency generic param - SomeApi → our second dependency defined in the
ProxyProvider3dependency generic param - SomeService → our third dependency defined in the
ProxyProvider3dependency generic param - YourDependantService? → stripped out because it is going to be null since we are going to create one.
With all bases covered, it is time to refactor main.dart and move our main page to HomeView to take advantage of what we had set up along the way.
Open up main.dart file and refactor it until it looks like this:
import 'package:flutter/material.dart';
import 'package:provider/provider.dart';
import 'package:retrofit_dio_example/core/constants/app_constants.dart';
import 'package:retrofit_dio_example/provider_setup.dart';
import 'package:retrofit_dio_example/ui/router.dart' as router;

void main() {
  runApp(MyApp());
}

class MyApp extends StatelessWidget {
  // This widget is the root of your application.

  @override
  Widget build(BuildContext context) {
    return MultiProvider(
      providers: providers,
      child: MaterialApp(
        title: 'Flutter Demo',
        theme: ThemeData(
          primarySwatch: Colors.blue,
        ),
        initialRoute: RoutePaths.Home,
        onGenerateRoute: router.Router.generateRoute,
      ),
    );
  }
}
instead of returning the first page right away, now it returns MultiProvider with the MaterialApp as the root of our app where all pages live and loaded by router.Router.generateRoute function with RoutePaths.Home as its initialRoute as the first page being shown when the app opens/launches.
Our main() function clearly reflects the diagram I’ve shown you in the beginning of this article
Let’s rename the MyHomePage class to HomeView and move it to new file at lib/core/views/home_view.dart
import 'package:dio/dio.dart';
import 'package:flutter/material.dart';
import 'package:retrofit_dio_example/core/api/post_api.dart';
import 'package:retrofit_dio_example/core/models/post.dart';

class HomeView extends StatefulWidget {
  HomeView({Key? key}) : super(key: key);

  @override
  _HomeViewState createState() => _HomeViewState();
}

class _HomeViewState extends State<HomeView> {
 // nothing changed here, only moved so omitted for brevity
}
After moving our main page into its own file, now let’s create our first view model for HomeView. Create a new file at lib/core/viewmodels/views/home_view_model.dart and name the class HomeViewModel extending BaseViewModel. This view model will be responsible for fetching the posts data from PostApi and storing the page’s internal state.
import 'package:retrofit/dio.dart';
import 'package:retrofit_dio_example/core/api/post_api.dart';
import 'package:retrofit_dio_example/core/models/post.dart';
import 'package:retrofit_dio_example/core/viewmodels/base_view_model.dart';

class HomeViewModel extends BaseModel {
  HomeViewModel({
    required this.postApi,
  });

  final PostApi postApi;
  List<Post> posts = <Post>[];

  @override
  Future<void> initModel() async {
    setBusy(true);
    await fetchPosts();
    setBusy(false);
  }

  Future<void> fetchPosts() async {
    final HttpResponse<List<Post>> response = await postApi.getPosts();
    final int responseCode = response.response.statusCode ?? 0;

    if (responseCode < 200 || responseCode > 299) {
      return;
    }

    posts = response.data;
  }
}
On this HomeViewModel, we take in PostApi as required named constructor dependency. With this approach (colloquially called dependency-injection, but I digress), dependencies are brought into the HomeViewModel through constructor, thereby making writing unit test in future (and next article) much easier as we can simply swap out PostApi with the mock ones in unit tests.
Our fetched posts list from PostApi.getPosts are stored in posts variable and later on accessed from HomeView. The fetching process occurs in fetchPosts method which are just a run of the mill async network call/HTTP request method, which are called in initModel method. setBusy calls are meant to update the busy/loading state and pass the state changes to view layer. Alternatively, you could also use notifyListener to do something of similar effect without changing busy states.
Before moving on to refactoring lib/ui/home_view.dart, let’s take a moment to get back to lib/core/api/post_api.dart and change the return type of getPosts method to be Future<HttpResponse<List<Post>>>, this will enable us to capture HTTP status codes in the HomeViewModel as shown in the code above. Save it and run flutter pub run build_runner build --delete-conflicting-outputs to regenerate the generated retrofit codes so it would reflect our latest changes.
Finally, let’s move on and refactor lib/ui/views/home_view.dart to take advantage of this MVVM thingy we set up throughout the article. Open up home_view.dart file and make the changes from the code below:
import 'package:flutter/material.dart';
import 'package:provider/provider.dart';
import 'package:retrofit_dio_example/core/api/post_api.dart';
import 'package:retrofit_dio_example/core/models/post.dart';
import 'package:retrofit_dio_example/core/viewmodels/home_view_model.dart';
import 'package:retrofit_dio_example/ui/views/base_widget.dart';

class HomeView extends StatelessWidget {
  @override
  Widget build(BuildContext context) {
    return BaseWidget<HomeViewModel>(
      model: HomeViewModel(
        postApi: Provider.of<PostApi>(context),
      ),
      onModelReady: (HomeViewModel model) => model.initModel(),
      builder: (BuildContext context, HomeViewModel model, _) {
        return Scaffold(
          appBar: AppBar(
            title: Text(
              'Flutter Retrofit Example',
            ),
          ),
          body: _buildBody(context, model),
        );
      },
    );
  }

  Widget _buildBody(
    BuildContext context,
    HomeViewModel model,
  ) {
    if (model.busy) {
      Center(
        child: CircularProgressIndicator(),
      );
    }

    return _buildPosts(context, model);
  }

  Widget _buildPosts(
    BuildContext context,
    HomeViewModel model,
  ) {
    return ListView.builder(
      itemCount: model.posts.length,
      itemBuilder: (context, index) {
        final Post item = model.posts[index];

        return Padding(
          padding: EdgeInsets.all(16),
          child: Text(
            item.title ?? '',
          ),
        );
      },
    );
  }
}
This HomeView page build method are now wrapped in BaseWidget with the generic parameter being HomeViewModel, the view model being used for this page. Do note that one view model may be used in more than one page, yet the best practice is to keep one view model for one page.
Inside the BaseWidget constructor, the parameters passed are:
- model → the view model being constructed;
- onModelReady→ what function to call when the model is ready/loaded;
- builder → returns the whole page widget
To construct model, it requires postApi parameter to be filled in, this is where Provider comes to save the day, with MultiProvider, one can define the services being available to widgets under it and get it for usage with Provider.of<T>(context) where T is the service/api name desired, in this case it is PostApi.
One can think of this like a wireless cellular/wifi connection, wherein if one is in range of the cellular/wifi connection, then one can enjoy the connection and browse the Internet. This is similar case with MultiProvider, where one can enjoy the services/apis defined so long as the widget its ancestor(s) are child of MultiProvider, be it 1st or nth.
Next, we refactor the _buildBody and _buildPosts method to accept BuildContext and HomeViewModel, this is a common practice in building MVVM-based views/widgets since having the whole view model in widget’s build method is convenient to access the data/state contained within the view model.
Then, we can remove any old Dio reference within the _buildBody method of HomeView and instead listen from the HomeViewModel model state. Finally, we can move the circular progress indicator loading placeholder into an if clause of if (model.busy).
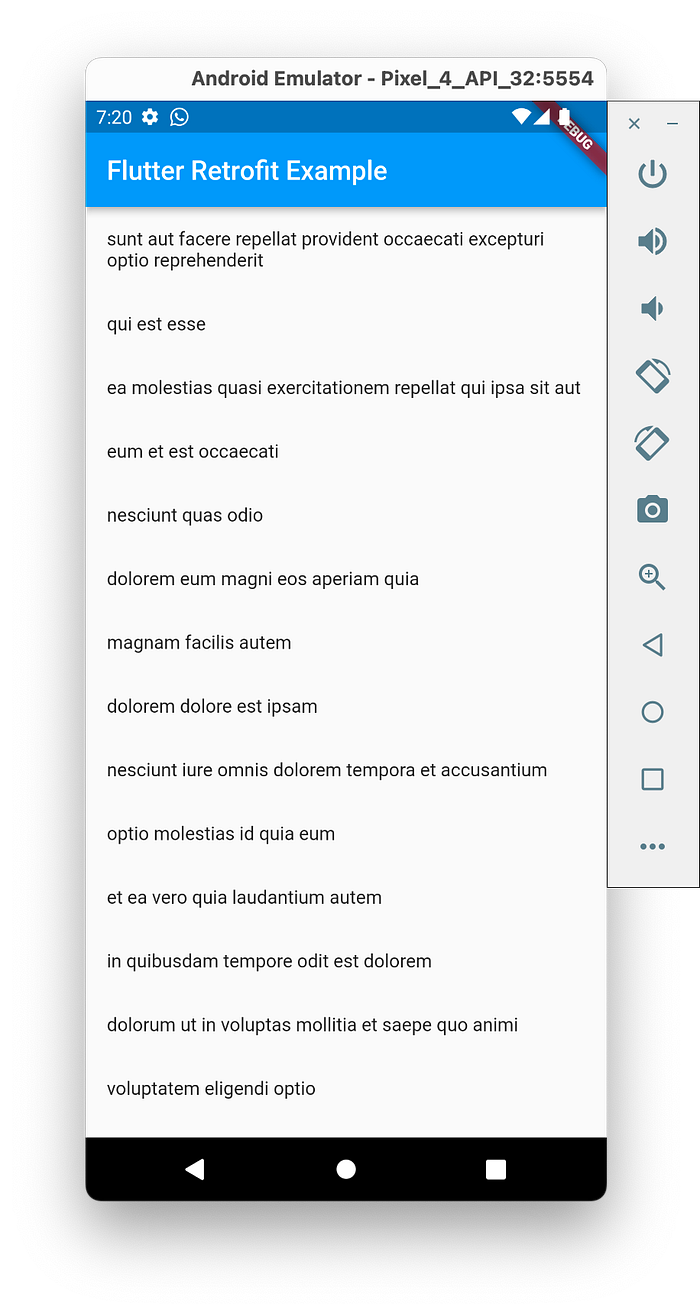
Run fvm flutter run and you’d be greeted with this screen if you’re succeeded in following this article.
On the next article, we will go through the basics of unit testing in flutter, then after going through the basics of unit testing, we will go more practical in unit testing our beloved `HomeViewModel`.
If you need to see the code repo directly, please kindly check my GitHub repo at https://github.com/aramadsanar/flutter_retrofit_example/tree/refactor/MVVM.
Thanks for reading and see you in the next article 🙌